
The Eagle Intelligent Health app provides doctors with a free electronic storage system that can vastly improve patient care. Our app can also help your hospital or clinic enhance the level of care you offer, while boosting productivity at the same time.
To add a user (such as a dependent or family member) to your account, go to your Eagle Intelligent Health homepage, click the plus sign in the bottom middle and choose the “Add Another User” option.
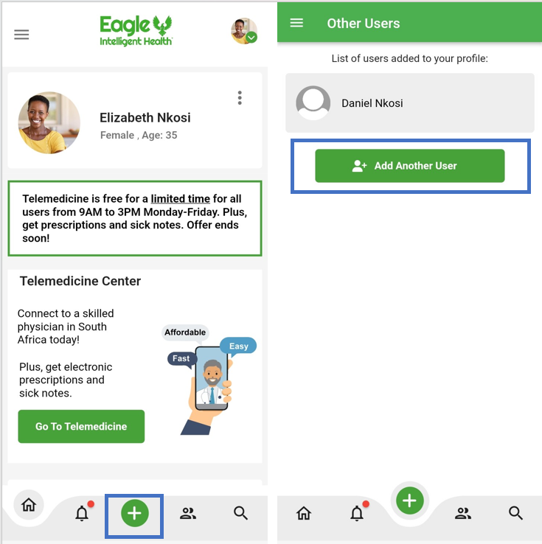
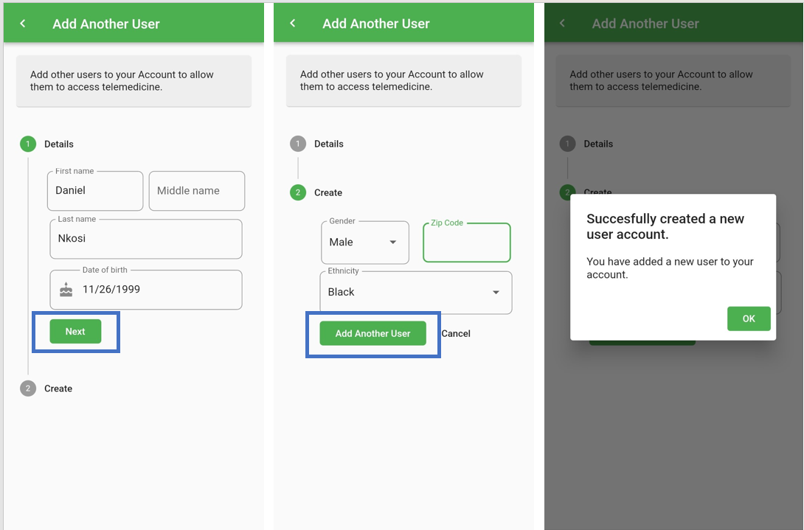
Fill in your additional user’s first and last name and date of birth and click the green “Next” button in the lower left-hand corner. The next step is to add in their gender, zip code, and ethnicity. Then, click on the green “Add Another User” button at the bottom of the page to finish adding your dependent.
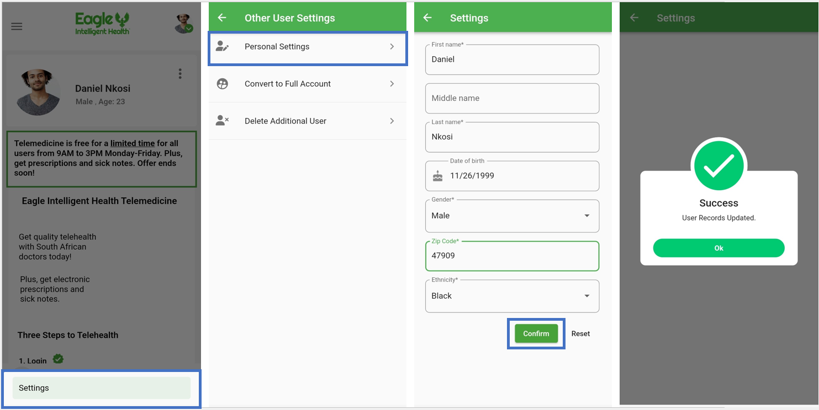
When you are done adding your user, you will see a success message to confirm that you’ve successfully created a new user account.
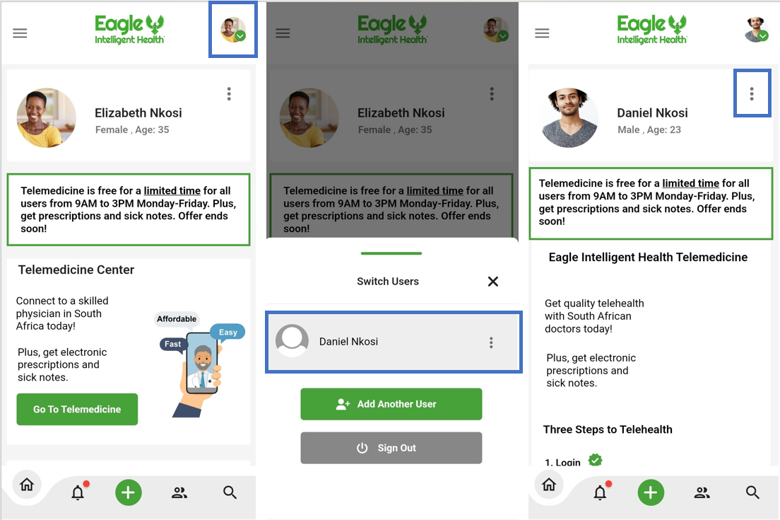
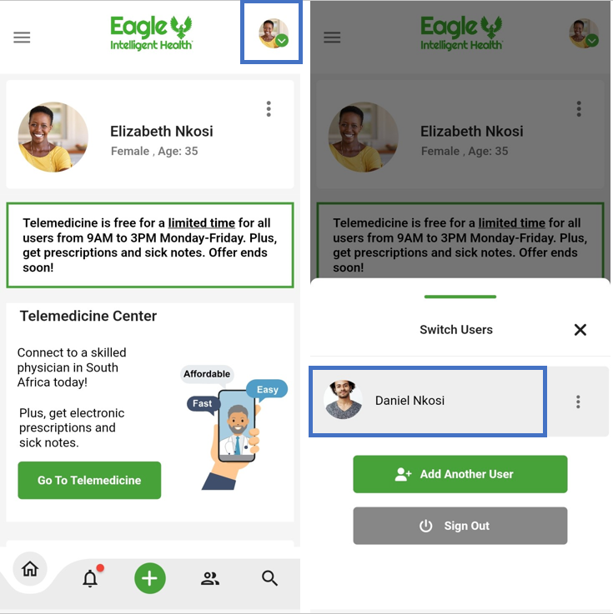
To delete an additional user’s account, select the drop-down arrow from the circle profile image in the top right corner of your screen. Then tap the three white dots icon next to the name of the user you’d like to delete. Next, select “Delete” and confirm removing them from your account by selecting “Delete” again.
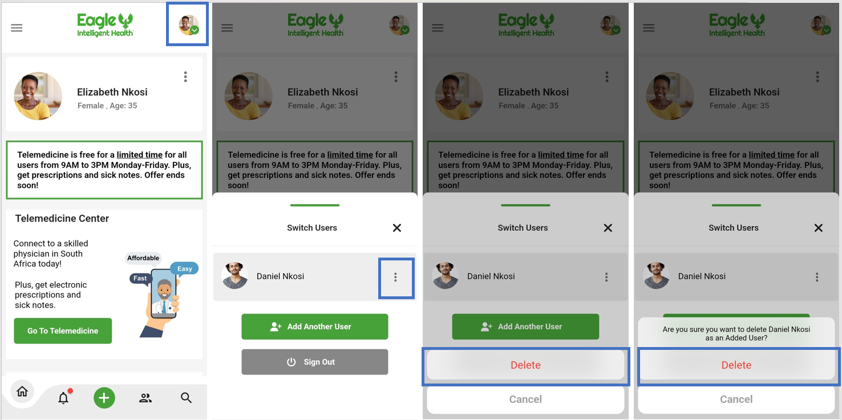
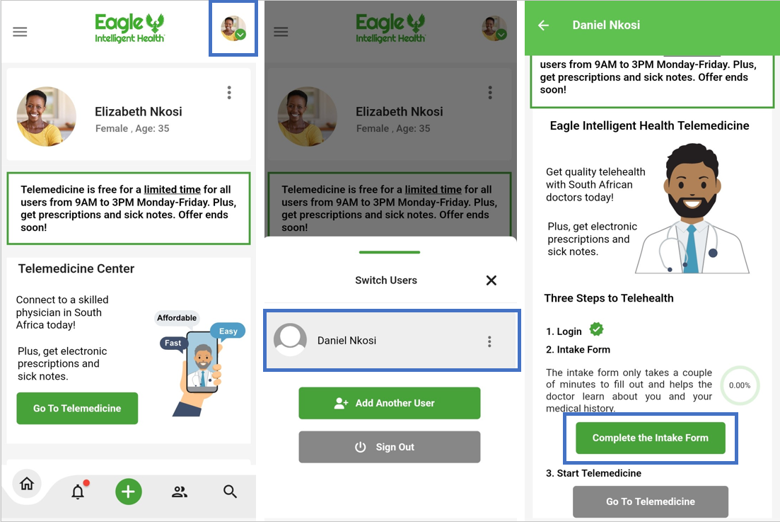
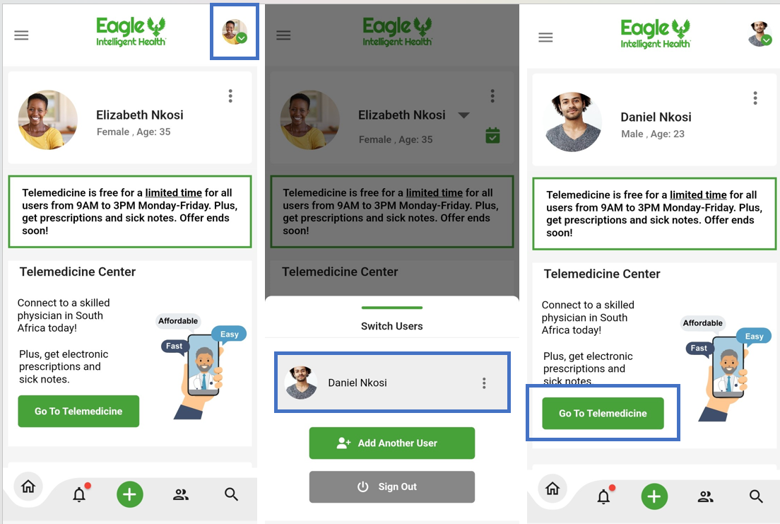
To see your additional user’s profile, select the drop-down arrow from the circle profile image in the top right corner of your homepage screen. Then, select your additional user’s name which will take you to their profile.
Prior to their telemedicine call, you will need to fill out their intake form. To fill this out, from their profile page, tap on the green “Complete the Intake Form” button and complete the form.
To update your additional user’s settings, go to your homepage and select the drop-down arrow from the circle profile image in the top right corner of your screen. Then, select the user you’d like to update by clicking on their name to open their profile. Once their page pulls up, select the three white dots icon next to their name.
Next, click on “Settings” from the bottom of the screen and then tap “Personal Settings” from the menu. Make any changes that you would like to their profile and click on the “Confirm” button at the bottom of the page to finish making changes to your dependent’s profile.
At the bottom of the “Progress Note” tab on an open case, there is a section titled “Medications” with a green plus sign next to it. To add a medication, select the plus sign and once the form pulls up start typing the medication in the text box next to the field titled “Medication.” Please note that if it does not populate exactly how you’d like, type out exactly what is needed.
To add medication instructions for the patient, go to the “Notes” section found at the bottom of the form and type in those instructions. For example, write “Take one a day, as needed.” Select the green “Add” button to add the prescription to the list.
Once the medication is added to the list, finish creating the prescription by selecting the box/boxes of the medication and clicking on the green “Create Prescription” button. The completed prescription will be located in the middle of the screen next to the section titled “Prescriptions.” The prescription will be available to the patient in their Eagle Intelligent Health app right away where they will be able to access it from there.
If it is needed to change the prescription due to a mistake, select the trashcan icon located next to the completed prescription in the “Prescription” section or by selecting the box of the medication and selecting the “Delete Medication” button. Once deleted, the prescription can be redone. Note: up to 10 medications at a time can be added and one prescription with up to 10 medications can be added.
One of the options after a completed telemedicine visit is creating a “Note” for your patient. These types of notes include a work sick note, a school note or any other kind of unique note the patient might request of you.
To create a note, go to the “Progress Notes” tab and select the green plus sign next to the section titled “Notes for Patient” found on the bottom of the screen. When the form pulls up, type in the note title next to the field that says “Note Title.” The title can be labeled as whatever the patient is needing (ex. “Work Sick Note”) and the fields below it can be used, as necessary. Each of these fields is optional so if nothing is written in a field, that field will be removed from the finalized sick note. For example, if there was no “Second Consultation,” that field blank can be left blank and it will be removed from their sick note.
Next to the field titled “Date of first consultation,” write the date the patient was seen by you. Next to the phrase that says “According to my knowledge/as I was informed, he/she was unfit for work from:” write the dates which they reported they were unable to attend work or which dates you are requesting they take off. Next to the field titled “Nature of Illness” include what has been observed and determined from their visit with you.
Once the green “Create” button has been selected on the form, the sick note will immediately be available in the patient’s Eagle Intelligent Health app where the patient will be able to see and access it. Please note: the sick note does take information from your profile and uses it, so make sure your profile is always up to date.
To create a referral, go to the “Progress Notes” tab and select the green plus sign next to the section titled “Notes for Patient” found on the bottom of the screen. This is the same location for writing a work sick note but instead the word “Referral” would be written in the field that says “Note Title.” The specialty can be included for instance by typing “Referral to Podiatrist.” Fill out each field that is relevant including “Date of First Consultation” or “Nature of Illness.”
In the “Nature of Illness” field, write the reason you are referring this patient. Please note: anything left blank in the form will be removed, while any fields filled out will be present in your referral. Select the green “Create” button to finish creating your referral and thus allow it to be immediately available to the patient in their Eagle Intelligent Health app.
(Note: In the months to come, the Eagle Intelligent Health platform will have specialists and a patient referral will not be needed but until the platform becomes available and specialists are hired, in order to best serve your patient, there will be the option of writing referrals as needed.)
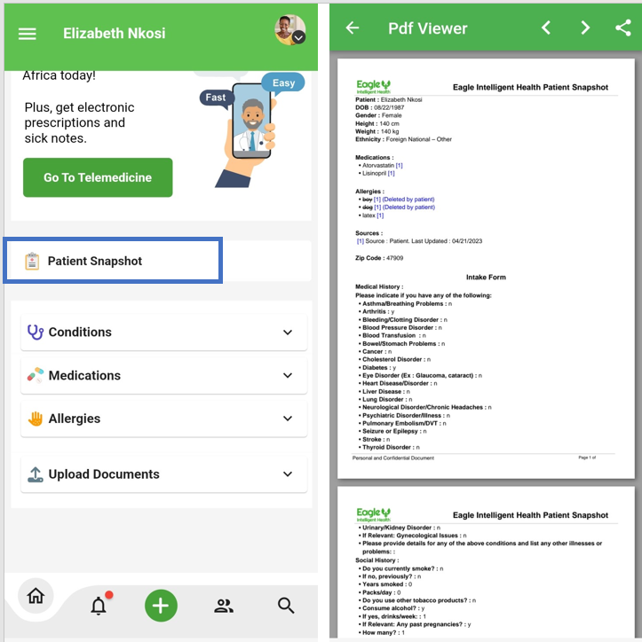
The “Patient Snapshot” is a concise bit of information which includes anything the patient has reported or information that has been previously recorded on the Eagle Intelligent Health platform. For instance, any medications or allergies the patient has can be seen. The information found in the “Patient Snapshot” will provide helpful information as the telemedicine call is taking place.
After a case has been taken and switched to the case Status, “In Progress,” the Patient’s medical information can be looked through from the Patient Snapshot.
To change the status to “In Progress” and see the patient’s medical information, click on the drop-down menu on the top right of the screen titled “Status” and select “In Progress.” Then, from the top left side of the screen, select the drop-down arrow on the “Patient” tab and choose “Snapshot.”
To review your patient’s medical history and see a patient snapshot, first open the case. To open the case, select the green “Open” button found on the second column of the “Telemedicine Cases” screen.
The provider that will be taking the case, will need to select “In Progress” from the “Status” drop-down menu found on the top right of the screen. Then go to the “Patient” tab found on the left side of the screen.
From the “Patient” tab, select “Snapshot” from the drop down. This will open a sheet that provides very easy to understand and easy to read information about their medical history, social history, and any conditions or medications that the patient is currently taking.
To review if the patient has seen other Eagle Intelligent Health providers, select “All Cases” from the drop-down menu of the “Patient” tab.
There are five different statuses that a case goes through from start to finish. These statuses are Open, Assessing, Waiting for GP, In Progress, and Closed.
The first status is the green “Open” Status which means that the patient has just entered into the telemedicine queue from their Eagle Intelligent Health app and that they have not yet been serviced.
The next status that a case goes through is the blue “Assessing” status which is where someone in chat triage
has picked up the case and is determining whether or not the patient is eligible and ready to see a telemedicine doctor or if they need to be referred out to see a doctor immediately in person or if this should not be a telemedicine call at all. Once that telemedicine user is ready to be seen by an Eagle Intelligent Health doctor, the person assessing in chat triage will change the status to “Waiting for GP.”
The status “Waiting for GP” means that the case is ready to be claimed by a doctor. When logging on to Eagle Intelligent Health and looking for which cases are ready to be serviced, look specifically for those in this status. Once it is selected, the chat triage and the patient’s history can be seen; then the patient can then be serviced.
Once the case is selected, change the status to “In Progress” which can be selected from the drop-down menu on the top right of the screen titled “Status.” Cases that are in this status mean that a doctor is currently servicing that case and is seeing the patient on telemedicine.
The last case status is “Closed” which will be listed under the “Closed Cases” tab, not the “Open” cases tab. After all of the information has been added into the telemedicine portal, close the case out and complete the transaction with the patient by selecting “Closed” from the drop-down menu on the top right of the screen titled “Status.”
To choose a case that needs to be served, select the “Open Cases” tab from the “Telemedicine Cases” screen. From here, there will be a list of statuses in the second column where there are cases listed saying “Waiting for GP.” This means that the patient is ready to be seen by a doctor.
Click on any part of this status and it will open a case. Once it is open, switch the status to “In Progress” which can be found in the drop-down menu on the top right of the screen labeled “Status.” This status will inform the other doctors that you have taken this patient and will be helping them moving forward.
To update the information on your profile, first click on the circle image on the top right corner of the screen and select the “Settings” option. This is information that can be changed as necessary. Select the green “Save” button to finish updating your profile when complete.
As you create your “Assessment and Plan,” assign a condition to the patient based on what you have observed and heard from the patient.
To add their condition to the portal, from an “open” case, click on the green plus sign found in the middle left of the screen titled “Conditions” under the “Assessment and Plan” section. When the form pulls up, start typing the condition that needs to be added in the text box titled “Conditions.” If the condition does not populate exactly as liked, type in whatever wording and it will save it as written.
Notes can also be written for this condition, as well as whatever else in the “Notes” section found below the condition drop down. Click on the green “Add” button on the bottom of the form to ensure the condition is listed and have it show up in the patient portal.
When ready to see your patient on the Zoom call, the only button that needs to be clicked is “Start Video Chat.” The “Start Video Chat” button is a green video camera icon located next to the patient’s name and case ID on the top of the screen. Selecting this icon will then send your patient a link to join from their app. It will also launch a new Zoom window for you.
From there, a pop-up screen will open with a message that says “Open Zoom Meetings.” Please note: if this message is not received, it may mean that there is a pop-up blocker and pop-ups need to be allowed on the page in order to allow the Zoom screen to open.
Once “Open Zoom Meetings” is selected, a Zoom screen will open and it will ask “Join with Computer Audio.” Either join with the computer audio or join with a phone call. It may be preferable to join by phone instead of with the computer audio if there are audio issues or slow internet. This can be done by selecting “Phone Call” and the region “South Africa” from the drop-down menu, where the Zoom meeting can be called into as well.
After these steps, you will be able to see your patient via Zoom screen. The Zoom screen does open on another page which will allow notes to be written into the doctor portal as the Zoom call is taking place or after the call has ended.
At the end of the call with your patient, a “Plan of Treatment” should be included. This is information provided to your patient about the call and what they are to do to get the treatment they need in order to get better.
In the text box labeled “Plan of Treatment” located in the middle of the screen of an “open” case, write, for example, “Needs to rest for 24 hours and drink plenty of fluids.”
Provide any information that happened during the visit that you feel would be sufficient and needs to be saved to the portal. For example, if a patient refuses treatment, include that in your Plan of Treatment so that it can be noted what you have provided for the patient and what they are providing as well. Anything included in the “Plan of Treatment” section will go into the patient’s Eagle Intelligent Health app where they will have access to it after the visit is concluded.
As you assess your patient during a telemedicine visit, in the “Progress Notes” tab there is a section titled “Review of Systems.” When completing a review of the systems, not all listed in that section need to be filled out; only fill out what is pertinent and makes sense for your patient.
To complete the Review of Systems, from an “Open” case, click on the “Progress Notes” tab found on the top of the screen. Scroll down to the section titled “Review of Systems” and select the drop-down arrow next to each one. Then select whichever boxes that indicate the different symptoms the patient is reporting or that has been observed. Each one that is clicked on will be automatically saved where it is then connected to that patient for that specific visit.
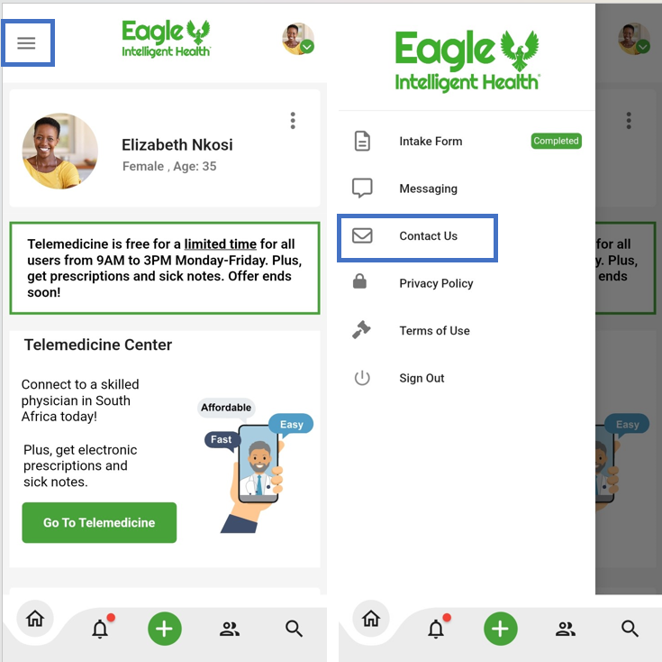
To leave feedback, ask a question, or report a bug, touch the three white bars icon in the upper left-hand side of your screen, and click on the “Contact Us” choice in the menu.
Then go into the contact form, fill out all fields, and make sure to let us know how we can help you.
Please know that we really appreciate your feedback in helping us to make it the best possible community experience for everyone and we’ll get back to you as soon as we can.
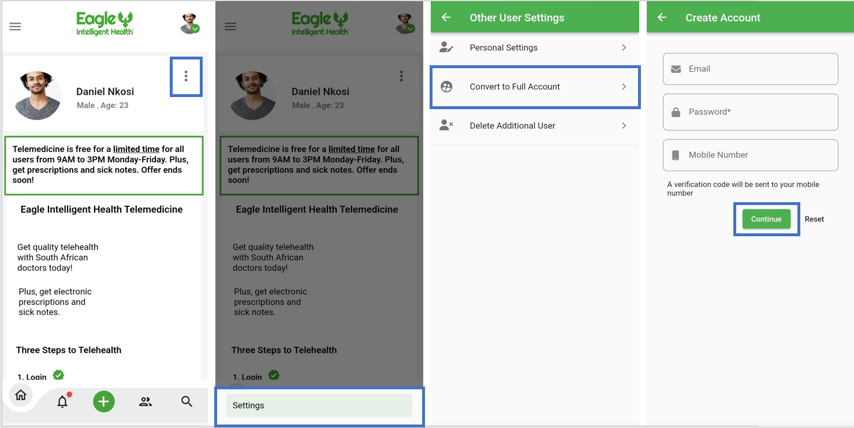
If you have previously created an additional user Eagle Intelligent Health account on another user’s phone but now have your own phone, you can convert your account from an additional user account to a full account on your own phone to retain all of your medical history.
To convert your account, select the drop-down arrow on the circle profile image at the top right corner of the main user’s homepage. Then tap your name under the list of additional users.
Once your page pulls up, select the three white dots icon found next to your name and click on “Settings.” From the menu, choose the option “Convert to Full Account” and then enter your email, a password of your choice, and your phone number. Tap “Continue” and you will be sent a verification code to your mobile number.
From your phone, you will then download the Eagle Intelligent Health app.
• Eagle Intelligent Health Android App
• Eagle Intelligent Health iOS App
Once it is downloaded, open the app and enter the verification code that was sent via text.
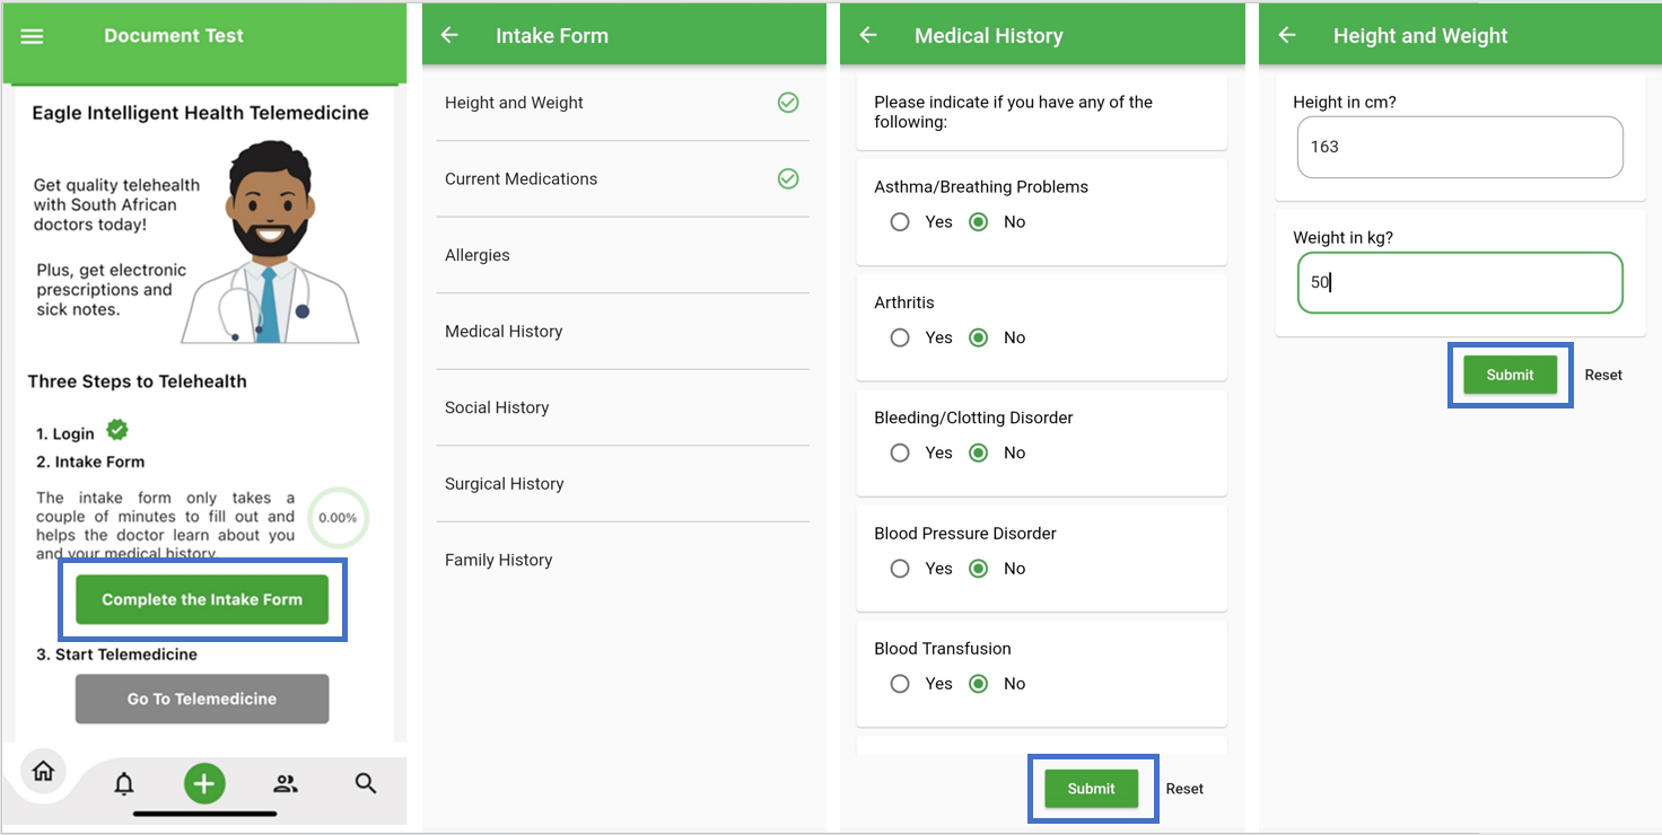
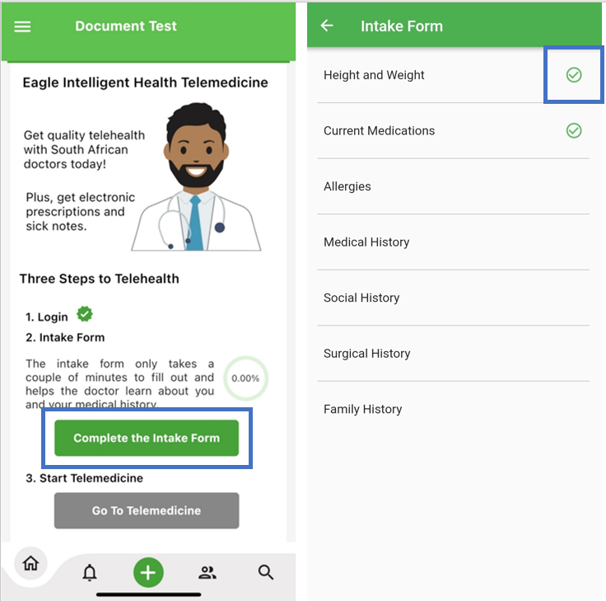
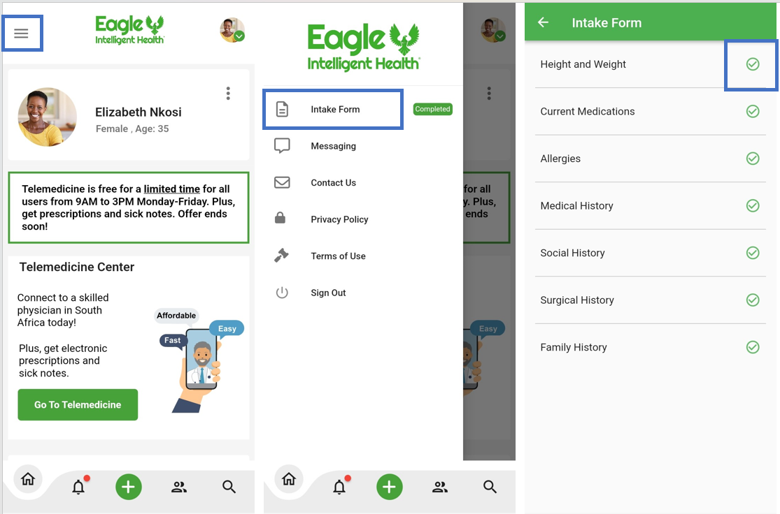
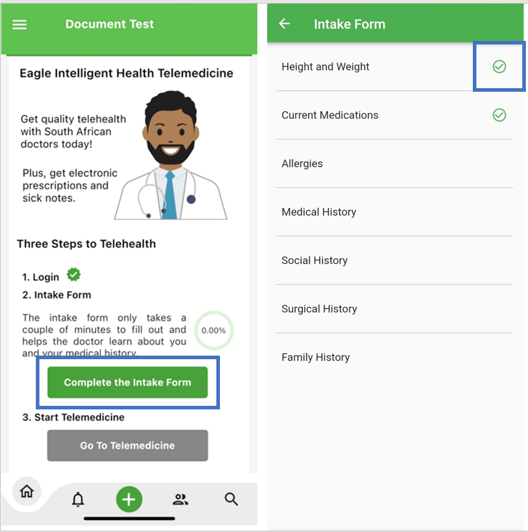
After you create your account, you will need to fill out an intake form that captures your medical history, medications, allergies, and more.
From your homepage, Select the green “Complete the Intake Form” button found in the middle of the page and fill in the details for each section. There will be a checkmark next to each section that has been completed.
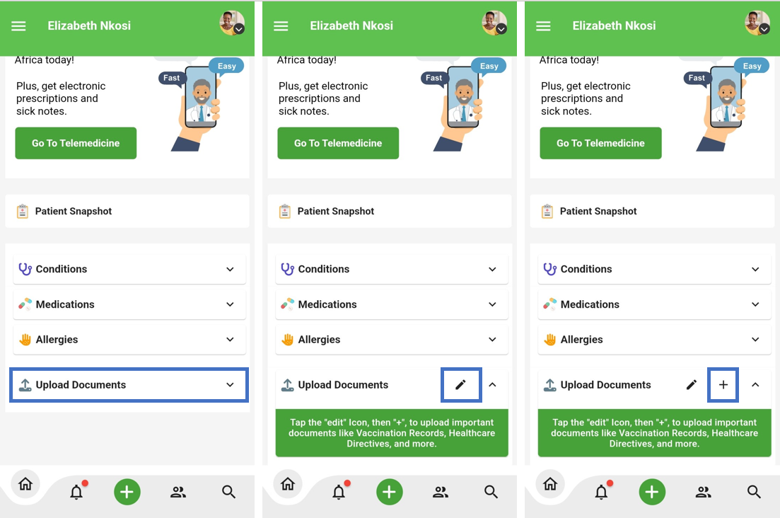
To upload documents such as insurance cards or vaccination records to Eagle Intelligent Health, select the “Upload Documents” section from the homepage. Tap the pencil icon and then the plus sign next to it.
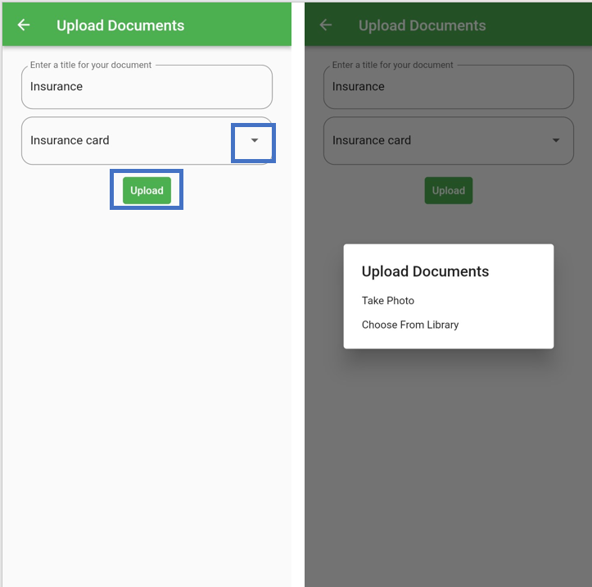
Once the page pulls up, enter a title for your document in the first text box and choose the document type from the drop-down menu in the second text box. Select the green “Upload” button; you can either choose “Take Photo” or “Choose From Library.” To choose a document from your library select that option and choose the file from your phone. To take a photo, select that option and take a picture of the document you would like to upload.
Each phone number can only be associated with one main account holder. Any additional users will need to be added as a dependent or an additional adult user.
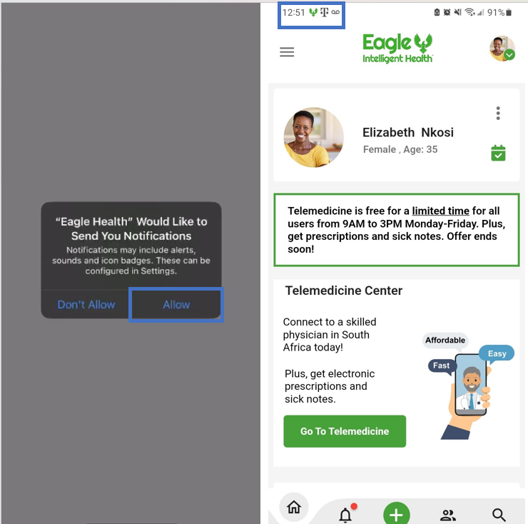
When you first sign up for an Eagle Intelligent Health account, you will get an option of whether or not you want to receive notifications. You will get notifications for the following things:
• When you get a new chat from the doctor
• When a sick note or prescription has been added after a telemedicine visit
• And also, for medication reminders
After downloading Eagle Intelligent Health and opening the app, you will get a pop-up that says “Eagle Health would like to send you notifications.” Select “Allow” if you would like to receive notifications. Notifications will appear as a green Eagle icon on the top of your phone screen.
Eagle Intelligent Health is a secure telehealth platform used by patients where they can initiate telemedicine visits with a skilled physician and hold essential medical records, including prescriptions, work notes, and more.
Eagle Intelligent Health is currently in its beta phase and for a limited time being offered free Monday through Friday between 9am and 3pm!
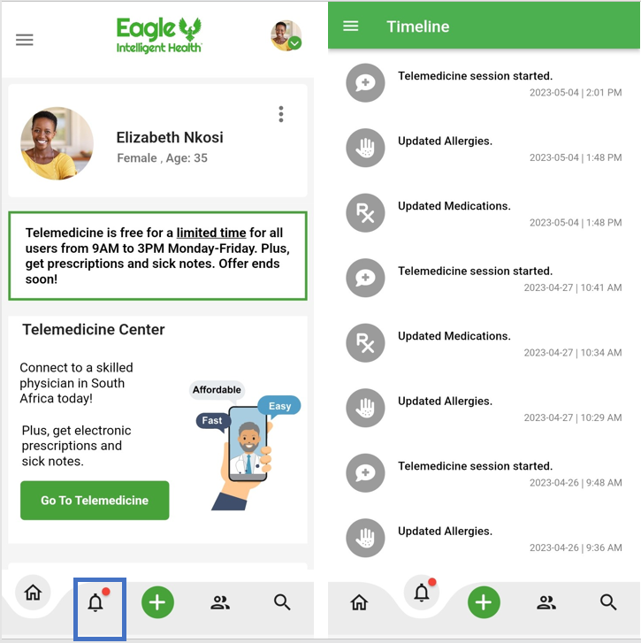
To go to your timeline, open the Eagle Intelligent Health app and click on the timeline icon in the bottom menu (looks like a bell.) This will take you back to your timeline where you’ll be able to see notifications for things like:
• Updates that were made to your medications and allergies.
• Notifications of telemedicine calls.
• And, more.
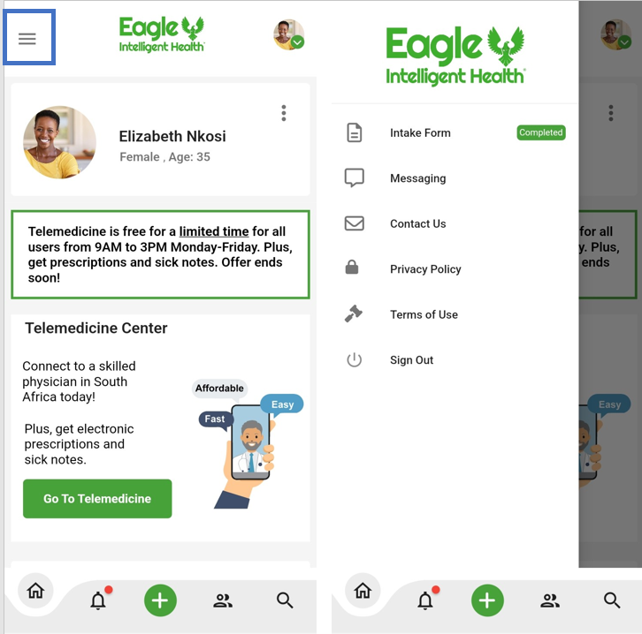
The Eagle Intelligent Health menu is on the top left-hand corner of the app homepage, and you can open it by touching the three white bars icon.
From your homepage, Select the green “Complete the Intake Form” button found in the middle of the page and fill in the details for each section. There will be a checkmark next to each section that has been completed.
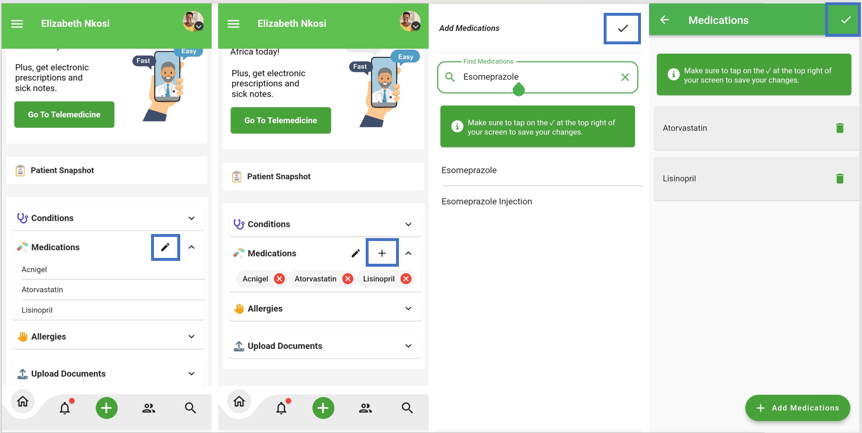
To add something to your medications or allergies, start by going to the homepage of your Eagle Intelligent Health app.
Choose which section you would like to add something to and click it to open the page for it. Click on the pencil icon and then the plus sign icon to add something in.
To add Medications: select “Add Medications” found on the bottom right and then type in what you would like to add to that section and click on the checkmark in the upper right-hand corner of the page. Then select the white checkmark in the upper right-hand corner to finish adding it.
To add Allergies: type in what you would like to add to that section and click on the checkmark in the upper right-hand corner of the page to finish adding it.
When you’re done, refresh your page and you’ll see the item that you added in that section. Please note that any added medication or allergy can be seen by the telehealth doctor.
If you would like to edit your intake form later, simply click on the white three-bar menu in the upper left-hand corner of your homepage and select “Intake Form” from the menu on the left. Next, select the tab you would like to make changes to and select “Submit” or the white check mark when done. There will be a green checkmark next to each section that has been completed.
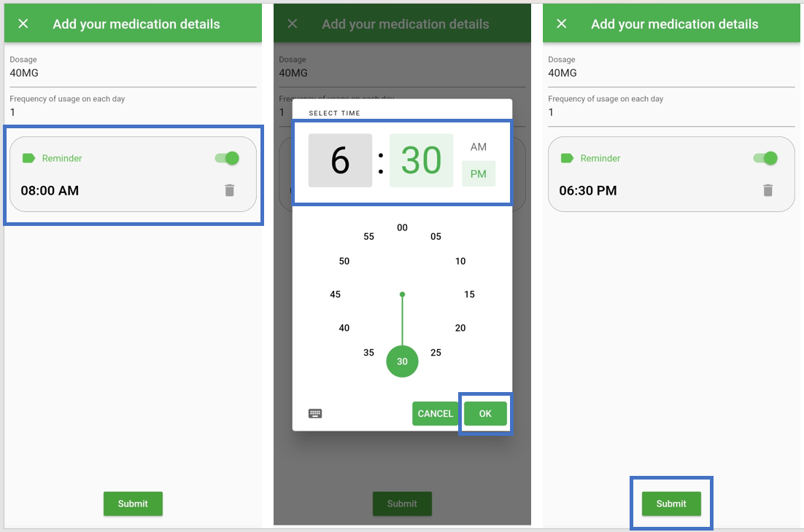
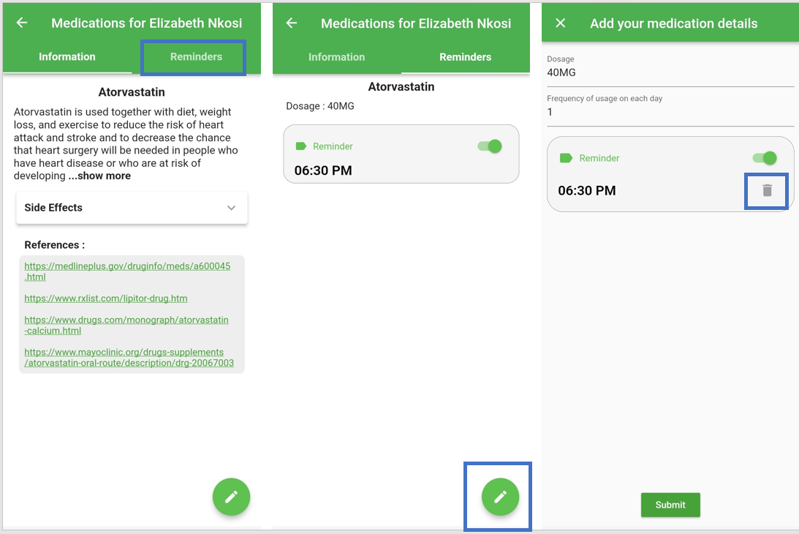
Start by going to your homepage on the app, click on your medications section, and then tap on the medication that you would like to set a medication reminder for.
When the information on that medicine pops up, click on the green plus sign in the bottom right-hand corner of the screen.
This will bring up your medication reminders page.
• Enter your dosage amount and daily dosage frequency.
• Then click into the box, where your reminder is, to update or add in your medication reminder.
• Choose the time that you would like to get the medication reminder.
• Start by choosing whether you would like the reminder to be texted to you in the “AM” or “PM” by clicking on it.
• And then choose the reminder time by clicking into the hour, and then the minutes and updating it to the time that you want.
• When you are done, click on the green “OK” in the bottom right-hand corner to finish adding in your medication reminder.
You will get a push notification sent to your cell phone with your medication reminder when it’s time for you to take your medicine.
If you decide later that you want to change or delete a medication reminder, follow the steps above to get back to your medication reminders page, and when you get to your page for the medication that you would like to delete, click on the “reminders” tab at the top.
To delete it, simply click on the pencil icon in the bottom right-hand corner and then select the trashcan icon. Click on the green “Submit” button to finish deleting it.
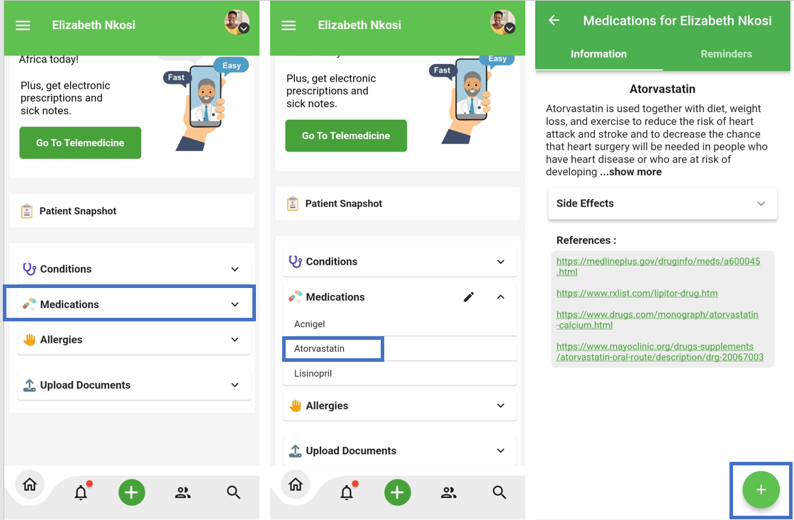
The Eagle Intelligent Health Patient Snapshot is a summary of your conditions, medications, and allergies and it can be found in the middle of the homepage.
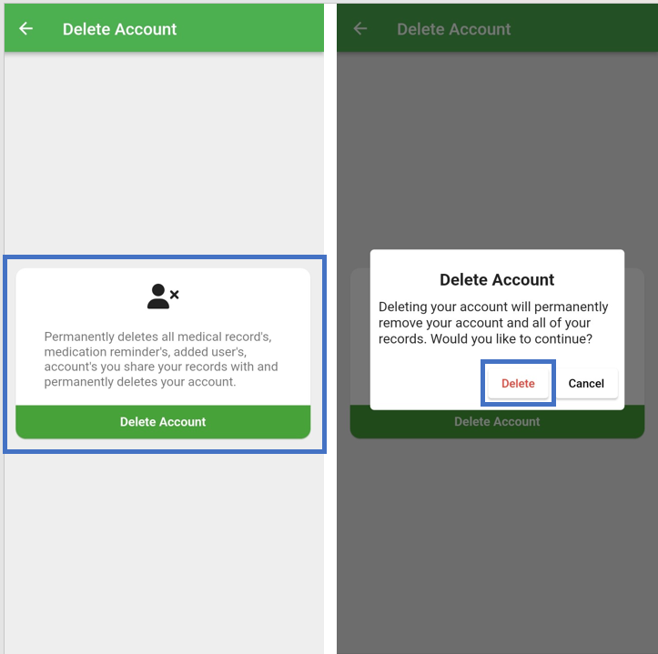
From the homepage, select the three white dots icon found next to your name, and then click on “Settings.” From the menu, select “Delete Account,” “Delete” and then “Delete Account” once more to confirm deleting your account since the data cannot be recovered after the action is performed.
It’s important to note that you need to share records with someone to chat with them on Eagle Intelligent Health.
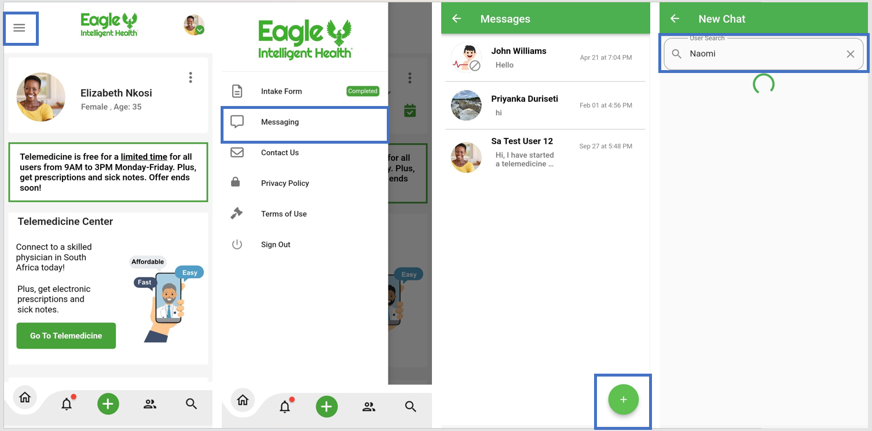
To message someone, click on the white three bar icon found on the top left of your Eagle Intelligent Health homepage. From the menu, select “Messaging” and choose who you would like to chat with. If you don’t see their name, click on the green plus sign in the lower right-hand corner, type it in the search bar to find them, and then click on their name to start a new chat with them.
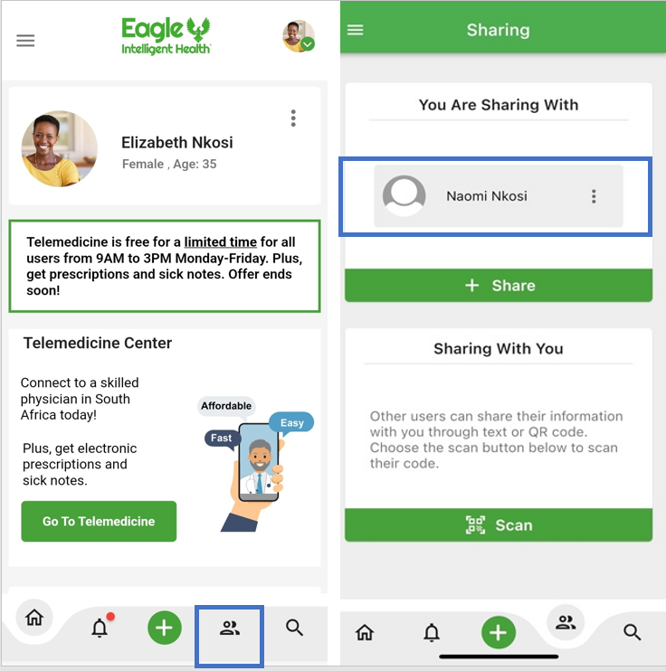
You can share your records with another user and other users can share their records with you by QR code (in person) or by text.
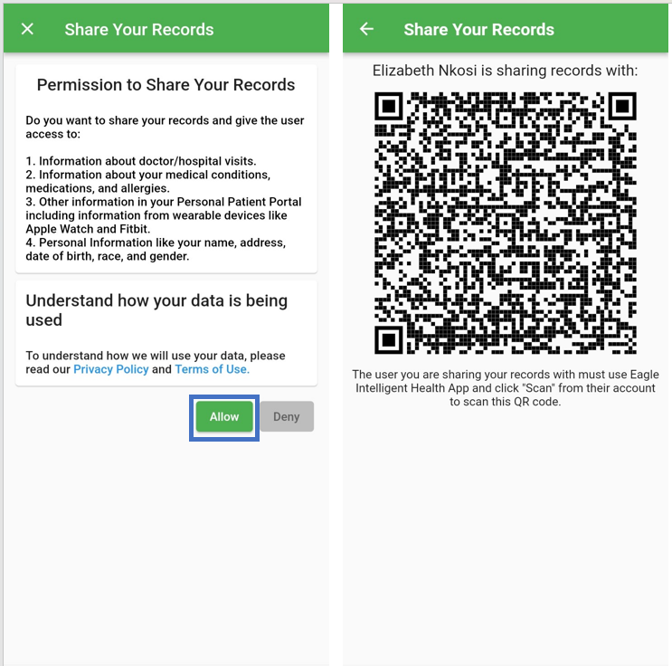
To share your medical records by QR code, select the “Sharing” icon found on the bottom of your app homepage. Tap the green “Share” button under the section titled “You are sharing With” and then select “Add in person (by QR code).” Select whether you would like to add them to your telemedicine calls or not, and then you’ll see the QR code. The other user must go on their Eagle Intelligent Health account to scan this QR code and view your records.
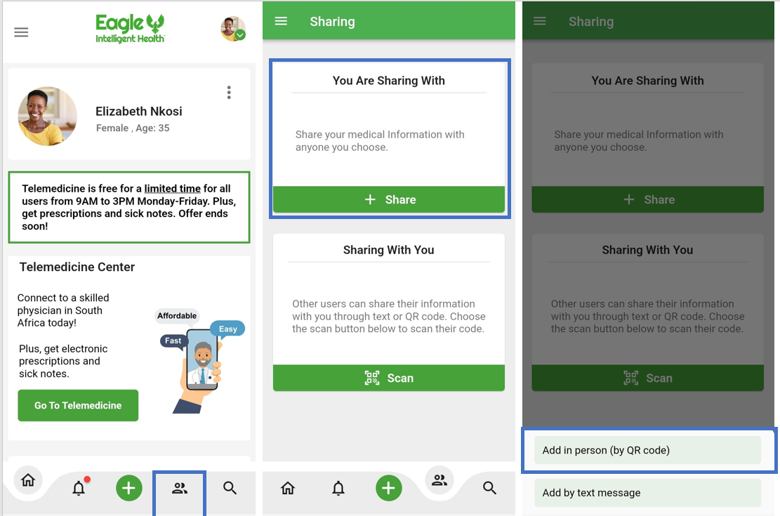
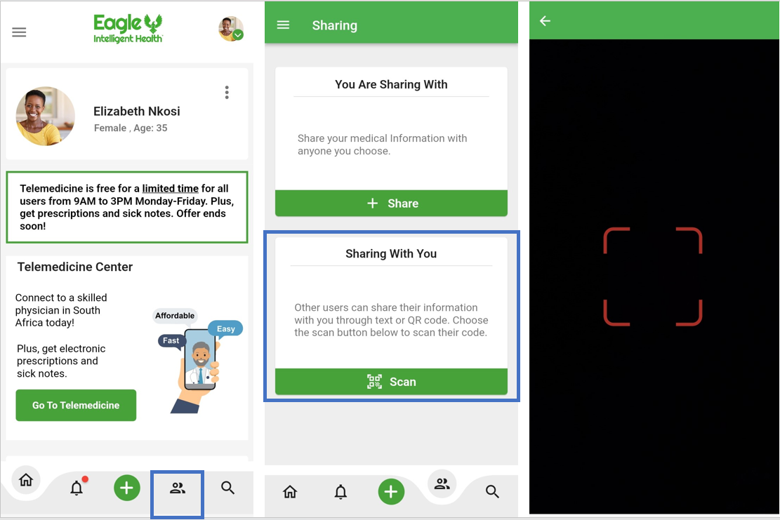
To scan the QR code, they would go to their homepage and select the “Sharing” Icon found on the bottom of the homepage. Once the page pulls up, select “Scan” under the section titled “Sharing With You” and scan your QR code.
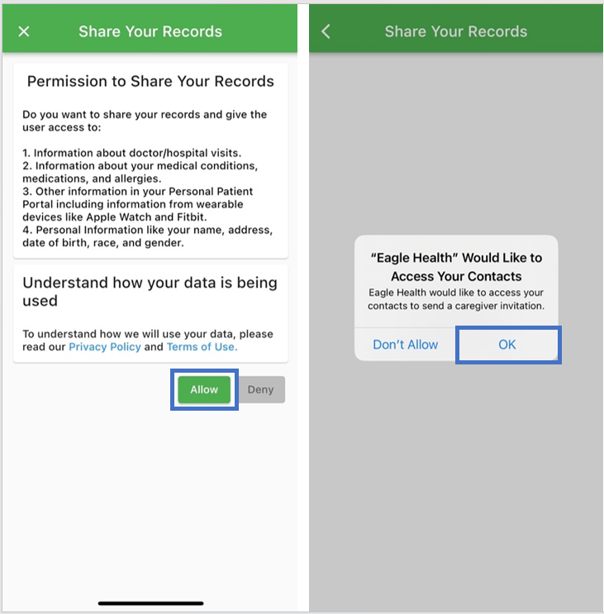
To share your medical records by text, select the “Sharing” icon found on the bottom of your homepage. Tap the green “Share” button under the section titled “You are sharing With” and then select “Add by text message.”
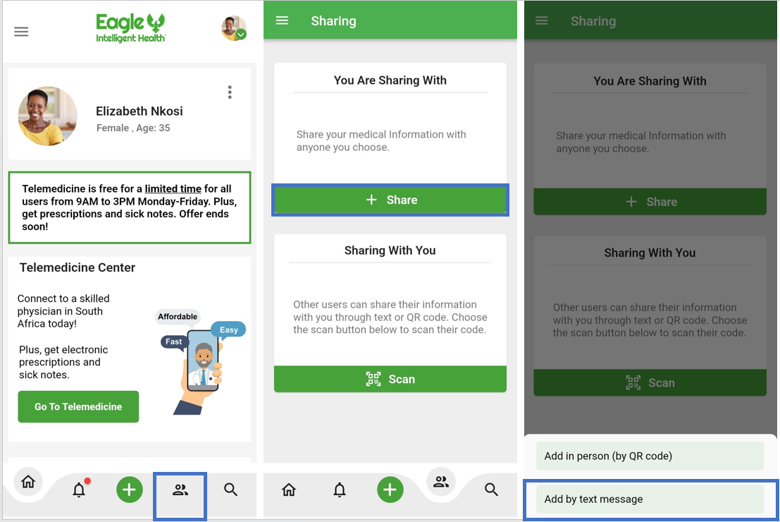
Select whether you would like to add them to your telemedicine calls or not, and give permission for Eagle Intelligent Health to access your contacts by tapping “OK.”
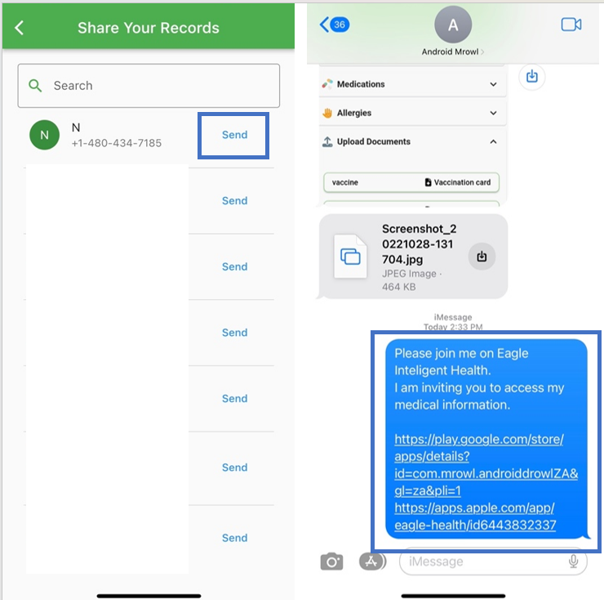
Then choose the contact with whom you would like to share your records and tap “Send” next to their name and phone number. The other user will then be sent a text message inviting them to view your records. Please note: the other user will need to click the link they have received in order to view your records.
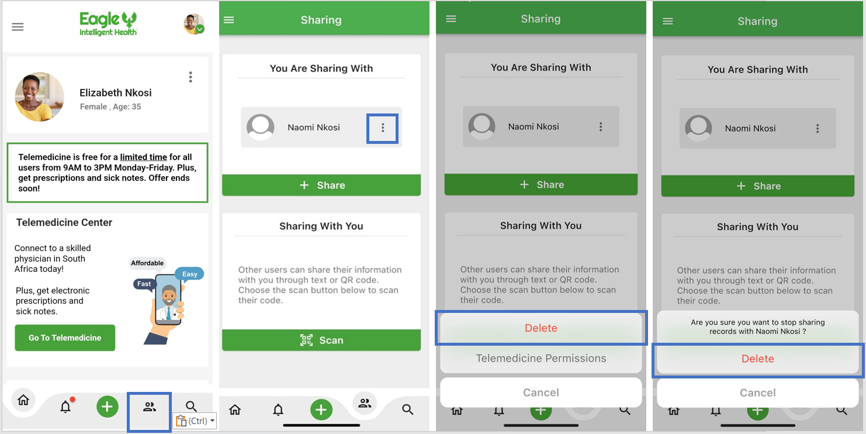
To stop sharing records with someone you had shared records with, select the “Sharing” icon found on the bottom of your app homepage. Under the section titled “You are Sharing With,” select the three white dots icon next to the user with whom you’d like to stop sharing records. Tap “Delete” and confirm by selecting “Delete” again.
To view shared records, select the “Sharing” icon found on the bottom of your app homepage. Under the section titled “You are Sharing With,” select the user whose records you’d like to view.
To add a family member or caregiver to a telemedicine call, you need to start sharing your records with them. To share records, see the FAQ titled “How do I share my medical records with other people.”
After you have shared your records successfully, any time you start a telemedicine call, they will be sent an invitation to join your telemedicine call to their cell phone. They will be able to accept or reject the invitation to join each time.
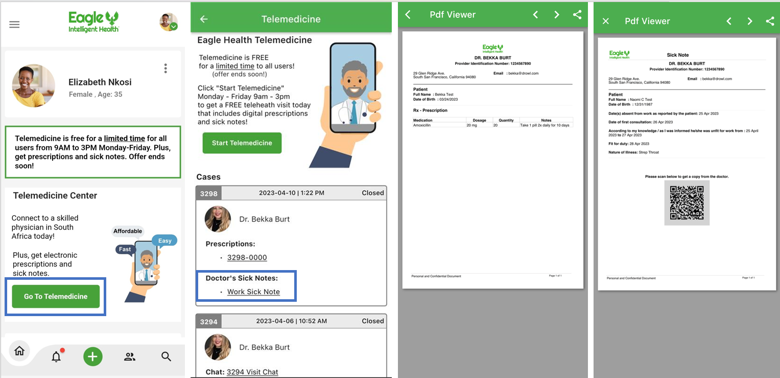
Eagle Intelligent Health allows users to get a work sick note or prescription through the app which can be accessed after your telemedicine visit. To quickly and easily get a required work sick note, follow these few simple steps:
1) First, go to either the iOS or Google Play store and download the Eagle Intelligent Health app.
• Eagle Intelligent Health Android App
• Eagle Intelligent Health iOS App
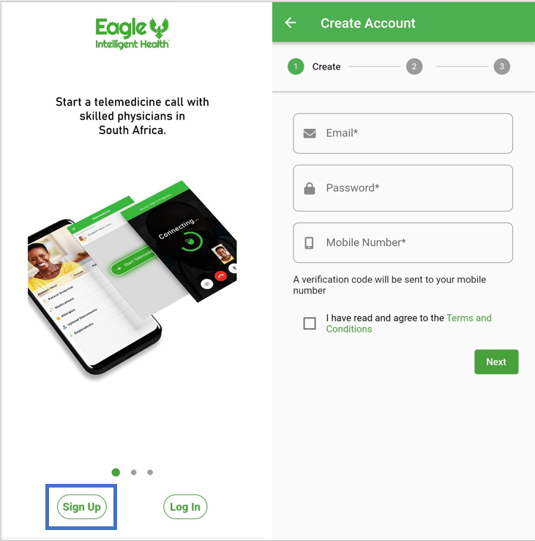
2) Next, sign up and follow the steps to create an account.
3) Then, from the homepage “Complete the Intake Form” detailing your medical history.
4) Next, from the homepage start a telemedicine visit with one of our Eagle Intelligent Health doctors.
5) Lastly, find your work note or prescription under the “Cases” section where it can be downloaded as a PDF document to your phone.
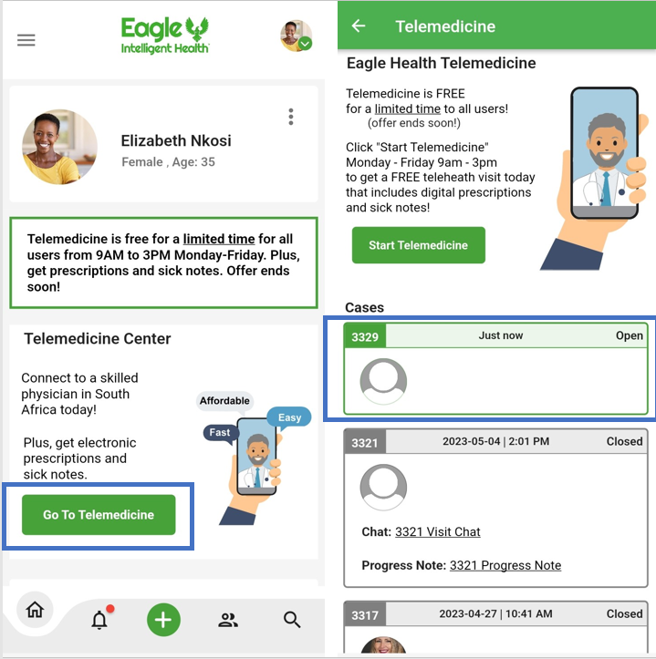
To resume a telemedicine call, simply click on “Go To Telemedicine” from your Eagle Intelligent Health homepage. Then select the most recent case found on the top of the menu under the “Cases” section.
To start a telemedicine visit with one of our telehealth doctors, you will need to start by completing an Intake Form in Eagle Intelligent Health so that your telehealth doctor can see your medical history.
See the FAQ article titled “How do I start using Eagle Intelligent Health after creating my account?” on how to complete the Intake Form if you haven’t done that step yet.
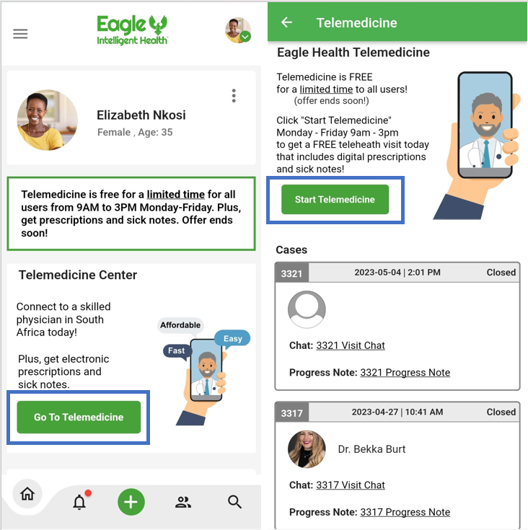
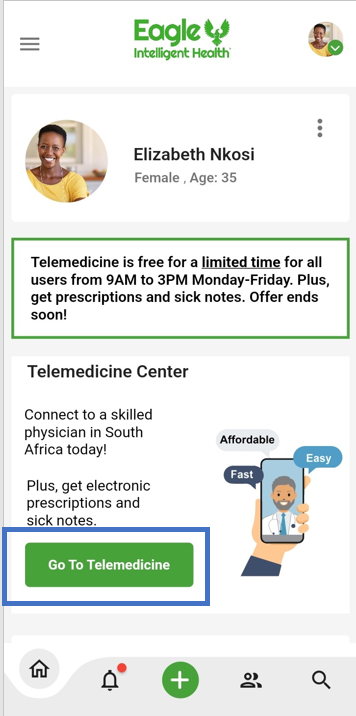
To start a telemedicine call, go to your Eagle Intelligent Health app homepage and select the green “Go To Telemedicine” button located in the middle.
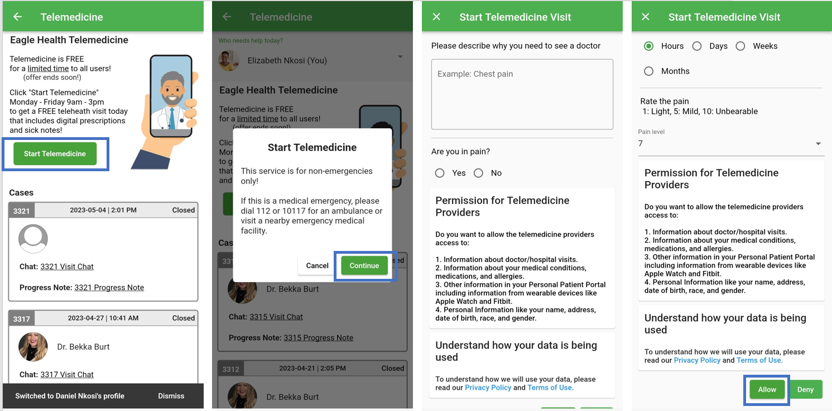
Once the telemedicine page pulls up, tap on the “Start Telemedicine” button. You will need to confirm whether or not it is for a non-emergency service by selecting “Continue” or “Cancel.”
You will then be taken to the telemedicine visit intake form to let the telehealth professional know what you are reaching out about. Please fill out that form and click on the green “Allow” button to start your telemedicine call.
To start a telemedicine visit for an additional user on your account, select the drop-down arrow on the circle profile image at the top right corner of your homepage. Then select the added user’s name and once their page pulls up, tap “Go To Telemedicine” to start the telemedicine visit. You will need to confirm whether or not it is for a non-emergency service by selecting “Continue” or “Cancel.”
You will then be taken to the telemedicine visit intake form to let the telehealth professional know what you are reaching out about. Please fill out that form and click on the green “Allow” button to start your telemedicine call.
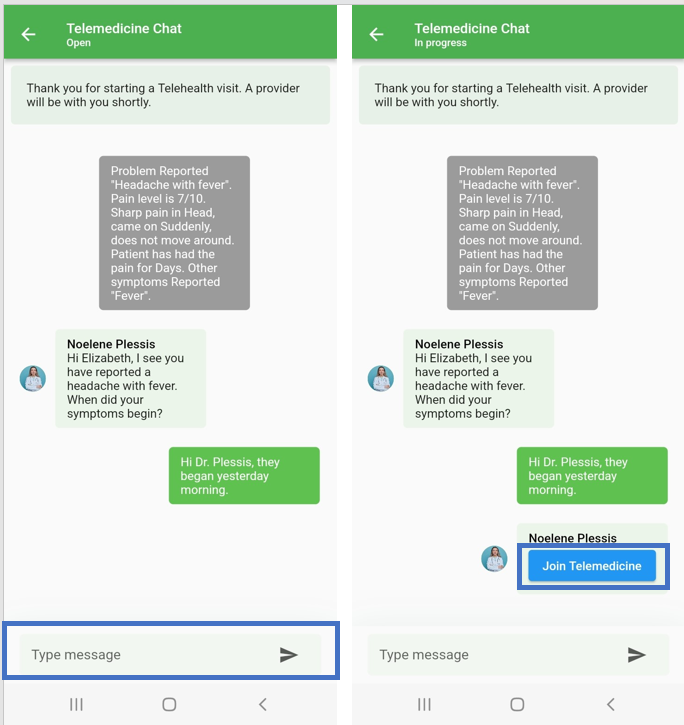
After you start a telemedicine call and fill out the telemedicine visit intake form, you will start in a chat triage where a doctor will be answering your chat and asking you questions to assess you and your condition.
You will answer the doctor’s questions by typing out your responses in the text box and sending the message with the paper plane icon to the right of the text box.
Based on the chat conversation, the doctor will then decide whether to initiate a telemedicine video call. Select the blue box that says “Join Telemedicine” to join the video call with the doctor.
A telemedicine visit is a doctor-patient call where a patient can receive medical diagnosis and treatment remotely through the Eagle Intelligent Health App.
During a telemedicine visit through the app, users can chat, message or video conference with a doctor to discuss health matters. Through this convenient and easy-to-use platform, doctors can write notes and provide digital prescriptions and work sick notes; all of which can be easily accessed anytime through the app.
After a telemedicine call, the doctor can provide digital prescriptions and work sick notes, all of which can be accessed easily through the app.
Digital prescriptions and work sick notes can be found under your “Cases” after the telemedicine visit. Tap on “Go To Telemedicine” found in the middle of your homepage. When the telemedicine page pulls up, you will see your digital records under “Cases.” To download the digital prescription or work note click on either the digital prescription which will be titled “Prescriptions” or work note which will be titled “Doctor’s Sick Notes.”

To increase transparency and allow for clear communication between doctor and patient, any notes that the doctor makes during a telemedicine visit will be in the “Progress Note” under the “Cases” section and can be accessed at any time.
